Wednesday, December 30, 2009

Trimming Wing Rib Gussets


The gussets on the wing ribs are mostly triangles and rectangles. They are glued on with the corners of the gussets sticking out past the curved upper and lower sticks.


In the factory photos you can see that they trimmed the corners of the gusset with a belt sander to create a smooth contour on the edges of the ribs. That actually works very well with soft glues like they used in the mid 1920s. Resorcinol is very hard once it cures and is not as easy to trim with the belt sander.


What really works well is a straight sided router bit with a roller bearing for trimming Formica.


You need a sole plate for the router with a very large radius on the edges so the gussets and any stray nail heads do not hang up on the edge. I made this one with a scrap of plywood and rounded the edges on the belt sander. I've lost my little table/router stand so I just clamp it in a work mate.


Adjust the height of the roller so it is near the top of the stick. This assures you get any glue which may have dripped down a stick. Also you need to rout each side of the rib once the gussets on that side are dry. Otherwise the roller will follow the gusset or glue from the first side or be adjusted so low it won't clean up all the glue.


Remember to rout in the spar openings as well. You'll need to touch up the inside corners with a mill file.

Monday, December 28, 2009

Wing Rib Gusset Glueing & Nailing

Now that the Christmas rush is over in the embroidery shop I'm back to building wing ribs while working on other projects. I've realized there are some things which could use some more explanation.


When mixing the glue I've found that mixing by volume vs by weight is the easiest. I've also found that the amount of glue needed to put all the gussets on 2 sides of a rib is exactly the amount using 4 teaspoons of Liquid Resin with 3 teaspoons of Powdered Catalyst. I've found that clear plastic drink cups work great. Recently I got some shallow clear plastic pill dispensing cups, they're even better, harder to spill. I use a metal teaspoon since it's easy to level the catalyst with a popsicle stick. It's also easier to wash the metal spoon clean after measuring each ingedient to make sure the unused portion in the can is not contaminated. One of the nice things with Resorcinol is that it washes up with water until it cures and becomes waterproof.


I measure the catalyst into the drink cup and the resin into the pill cup. The drink cup is easier to poor from slowly while mixing in the pill cup. The 3rd cup in the picture is a gauge to double check whether I've put in the correct amount of resin.


I reuse the cup for the Catalyst so I've drawn a line on it as a double check in case I get interrupted while measuring.

That doesn't work as well with the Resin since I use that cup to mix the glue. Since the cups are clear I have a cup which I can set the Resin cup into to check that the correct amount of resin was measured. I also have a line on it for the volume after mixing which is less than the 7 teaspoon total.


I've made 2 little videos to help explain how to install gussets.

The first covers applying the glue, just to the areas needed.


The second covers using the nailer.


These methods seem simple and obvious but they reduced my time to build assemble and nail both sides of a rib from 2-1/2 hours to 1-1/2 hours. With so many ribs to build it's a big savings over holding the nails with pliers and using the tack hammer.

Sunday, December 6, 2009

Elevator Horn Material Thickness

I've been working on how to make new elevator and rudder control horns. They are not used on the Waco Ten so there aren't many people to ask. There is one on each elevator and the rudder. They are stamped as 2 metal shells and welded together along the edge to form a rigid streamlined shape. There is no drawing I've found for these and they are more complex than almost anything else on the plane so I believe they were simply purchased as new WWI surplus. We built our Fly Baby with a lot of WWII surplus parts from the A & N store before they discovered Levis and Nike.

The outside shape was easy and I'll cover that in another posting. The bigger problem was the metal thickness. I have one horn on the rudder which is in good shape and one on one elevator. This elevator has rust problems but the horn is usable so I didn't want to damage it to measure the metal thickness.
Also at each end there is a piece of steel welded in the tab end making the tab 3 layers thick all welded along the exposed edge. The three layer tab measured .110" thick which leave a couple possibilities for the 2 shells and the inserted tab. The most likely combination was all three being 20 gauge steel (.o359").


The idea was to make a go-no-go gauge from 2 pieces of welding rod with feeler gauges taped between them. with this the thickness of the tab insert could be measured and the thickness of the shell becomes half of what's left from the .110" total


We don't need an exact measurement just close enough to determine the gauge size of the steel. By adjusting the stack of feeler gauges between the wires in .oo2 increments it was easy to show that the steel is 20 gauge.


I've included a video which explains this better but even at the lowest resolution it's 62 mb. I have a higher resolution version but it's 229 mb. If you have a high speed connection check out the video.

Sunday, November 22, 2009

Elevator Ribs


Today I started making the ribs for the elevators. These are made of 5/16" tubing. After cutting them a little long I square one end on the belt sander and clean up any burrs.


Next I flatten the bottom of the tube hitting it about 30 degrees from vertical.


Then I turn the tube over and position the end so its 3/8" past the center of a heavy walled piece of 1" tubing, same diameter as the spar. By flattening the end on the tube you end up with the rib end shape needed. If its a little long just shorten it on the belt sander. About 4 whacks with the hammer and the whole job is done.


The other end is fish mouthed to fit the Trailing Edge tube.

One tube is square to the spar. The tube on the other side is offset about 1" at the trailing edge.

Saturday, November 21, 2009

Elevator Jig & Fabricating Parts


Before I started on the tail surfaces I took all the various drawings I had and the existing surfaces and created a drawing which is as close to exact as I can do. All the drawings were made after the plane was built. I have only found 2 drawings for the NINE which were drawn before my plane was built. They are for the radiator and are in the Rome Turney Radiator Company collection of the Rome, New York historical society. They exactly agree with the later production drawing of November 1930. The jig board was laid out from my drawing and was done to allow both the stabilizer and elevators to be made with one jig. The cut outs are to allow tack welding with a torch. I know there are great new welding methods and equipment. If it were a safety issue I'd go with the new methods otherwise using them misses the point of this restoration hobby.


Because the ribs pass above and below the spars I wanted the spars, leading edge and trailing edge tubes all on a plane parallel to the board. To do this and hold the tubes in position for tack welding I made these blocks which have the same distance from the board to the tube centerline. They were made by drilling the holes for the different size tubes in a simple jig and then sawing them through the holes. They are screwed to the jig board so they can be removed as needed to make the different surfaces.


The first task was to make the trailing edge from 5/16" tubing. I started with the bend which would be the hardest to get right if not done first, the small bend at the inboard end. This was done with a simple tubing bender which had the needed bend radius. This bend was used as a reference point as the rest of the tube was bent while being held flat on the jig board. That's why some of the weld cutouts were still screwed in place. They contained part of the curve for the Trailing Edge tube.


To make the larger bend I made a simple wooden bender with a large radius to get smooth bends. The radius is still significantly smaller than any on the tube. I worked from the inboard end out making very small bends while holding the tube flat on the jig board. The first one took about a half hour and the second twenty minutes.


Next the outboard end of the spar was flattened and filed to fit the trailing edge tube. This was done first because it is easier to locate and drill the hole at the inboard end then it is to flatten the tube.


The inboard end of the spar was marked for the Trailing Edge hole by rubbing with a small square. The hole was drilled through the spar and the Trailing Edge tube will be trimmed off after tack welding.


The tubes are held in the jig blocks with a piece of plumbing strap held down with the mounting screws.


The rest of the pictures show details of how the original elevator was welded together. Starting with the inboard end joint of the spar and trailing edge.


The next 2 are of the Spar to Trailing Edge joint at the outboard end.


The next 3 are of a typical Rib to Spar joint.


These 2 are of a typical Rib to Trailing Edge joint.


The last is of the elevator control horn and 3/4" tube rib.

Great Neck Magnetic Brad & Nail Driver


I found this nail driver on line from a tip I picked up at the antique fly-in in Iowa this year. It's the Great Neck model BD1. I was not impressed when I first got it because I expected it to be spring operated like a one handed center punch. After some experimenting and building a rib with it I realized some minor improvements would make it into a great tool. It's primary attribute was a price of less than $5.00, but now I will use it for all my rib building, etc.

The first change was to buy a 1-1/4" chair foot at Lowes. I mixed a little epoxy and filled the foot about 1/4 full. Then I stood the handle of the driver in it and left it to dry over night. Next I used my belt sander to grind off the ridges to make a nice palm face. The last thing was to rough up the end and install a short piece of heat shrink tubing to allow me to more easilly slide the sleeve down if I want to see if I have a nail in the holder.


Using it is easy. I have a shallow bowl of nails I can pick up with my right hand, to the right of the gusset I'm nailing. Yes I'm right handed and not even sure I could pick up a 1/4" nail with my left hand. With the nailer in my left hand I drop the nail head first into the magetic holder.


Next position the tip of the nailer where you want the nail. I've marked my jig with a red felt marker at each nail location. It helps me know where the nails go and as a quality check when I'm done to verify I did not miss one, or serveral as the case may be. Now hold the nailer vertically and gently press down until the nail contacts the gusset.


A light slap with your right hand on top of the nailer will drive it home. If you leave one a little high just finish it with a tack hammer. When I'm done nailing I run my finger over every nail. Any that feel high I touch up with the tack hammer.

This thing is way better than needle nose pliers and a tack hammer.

Friday, November 20, 2009

Building Our First Rib


The first week of 2009 our grandkids Rowan and Duncan stayed with us. Rowan helped grandpa build the first rib in our WACO NINE restoration. The first part I did myself. I started with 1"x6"x6' boards of sitka spruce. Those boards were cut into 3 pieces about 2" wide. These were then sawed on edge to make 2 strips 3/8" thick. These more manageable strips were sawed into a lot of sticks 3/8" x 1/4", some 3/8" x 3/8" for spar attach sticks, and a couple 3/8" x 3/4" for nose blocks.


After we did the first rib perfectly, I broke several sticks trying to bend them. Well it was the dryest time of the year. Everything I read said there was no need to presoak the wood unless it was very dry. You're really not trying to get the wood wet. Bending is all about heat. The heat is transmitted by heating the water. The wood itself is a pretty good insulator, the water (steam) overcomes that resistance. We made a vase 2 ft tall from a piece of 4" schedule 40 PVC pipe and a toilet flange with the pressure test knockout still in place. Ok I design alternative waste water sytems as well as my embroidery business so this was easy for me. Any tall vase would work. You need to soak about 18" of the stick. That's all we're steam bending is the end of the sticks. My vase held exatly 1 gallon of distilled water to my 18" mark. Clearly the size I made it was meant to be. I soak the sticks 24 hours standing in the vase. I have 2 form blocks which each make an upper and lower stick, so I usually soak 4 sticks. While I'm steaming one set I start the next 4 sticks soaking. I've steamed way more sticks than I've made ribs so far because it's been harder to find time for building ribs.

Now we're ready to steam the sticks for bending. To generate the steam I bought a cloths steamer at Target or Walmart. I bought the cheapest one I could find. I probably should have found one with a little more heating power but it works. It just takes twice as long as all the literature said, 15 minutes per 1/4 thick. It takes mine 30 minutes and uses about a quart of water. The steaming tube is made from 2" schedule 40 PVC with a tee at the steam end. Yes it's a tee because there is a 1/4" drain line going downd to the water bottle to remove condensation.


I cut the tool end off the steamer tube and clamped it to a tube fitting screwed into the reducer in the end of the tee. Got all that? The supports are there to hold it at an angle, so water runs out. They are just plastic pipe hangers glued and screwed on. This thing get hot enough to melt the glue.


To monitor the steam temperature you need a thermometer. My cheap, note that theme, multimeter from Lowes came with a temperature probe. I have it stuck in a hole past where we need to bend the sticks, so we're sure it gets the sticks hot. Note the temp. on the meter. You have to let the tube get to temperature before you put the sticks in. The towel wrapped loosly around the end of the pipe slows, but does not block the steam. You want good flow to get good heat. We want heat not wet.


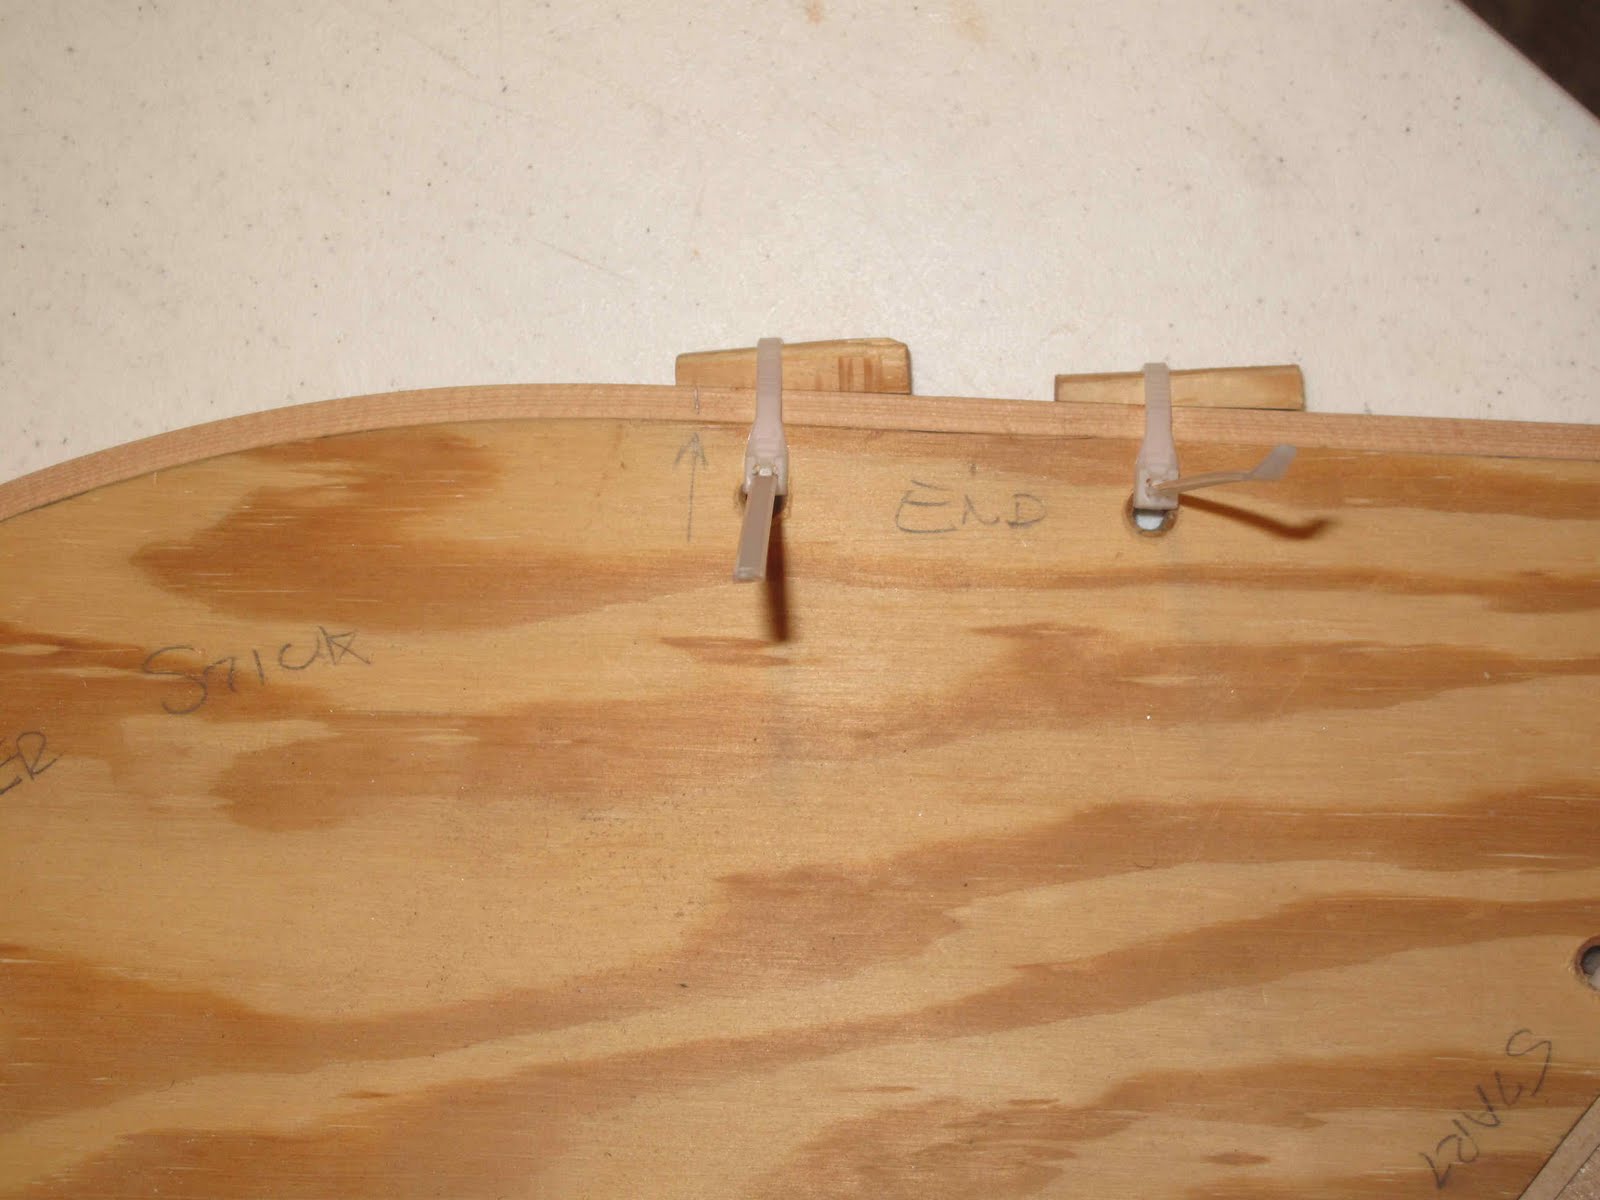
What you see in this pic are the cable ties criss-crossing in 2 places to support and separate the sticks so they get good even heat. You can see where they are on the outside of the tube because I plugged the holes with epoxy putty after lacing the cable ties. One of the holes is where I insert the temp. probe.


Compare the shape of the form block and the curve at the front of the rib. You have to overbend the sticks. They do spring back a little. We're only steam bending the areas which won't bend dry without breaking, basically from the spar forward.

Anyone who knows me knows I normally go for fancier ways to build things, but for this we're using a piece of scrap 3/4" plywood, some scrap pieces of stick, and some cable ties. I start with 2 cable ties loosely tied at the start end, left, of the block. Pull a stick out of the heat and clamp it with a long block. Gently but quickly form it to the block with the palm of your hand. Hold it there and clamp it with small blocks and cable ties. The books all say you have 5 seconds to form it while it's hot. It's true. Now rotate the block 180 degrees and do the next stick. I start with the lower stick then the upper so I don't have the end sticking out in the way when I go to do the bottom stick. Don't remove a stick from the heat until you are ready to clamp it, remember 5 seconds.


You can see all cable ties are going the same direction and I don't trim them. After they dry 24 hours on the block I cut them loose with diagonal cuters.

As soon as the sticks are both clamped, lightly mark where the front of the spars are, with pencil, so you can locate the sticks correctly in the jig.


My ace assistant helping build the jig. Is that intensity or what? The colored dots were my way of figuring out where I wanted blocks. We're back downstairs in the nice warm shop for this rather that turn on the heat in the attic just for glue to dry. The paper pattern is coated with paste wax. That good Carnuba wax is best, a little trick from Shop Smith.


You can see most of the blocks are round with an off center hole to allow adjustment. The 1/4" plywood block worked the best. You need them short enough to keep away from the glue.


Each stick generally has 3 blocks, 2 to locate on a line (the red ones), 1 to hold it tight against the other 2 (the blue ones).


Here all the sticks are in the jig ready for gussets to be glued on. The other rib layout is to flip the rib over when it's dry and put gussets on the other side.


My ace assistant again driving nails on the second side. I was sticking the nails in the gussets with needle nose pliers, glueing and then driving the nails. I now have a great tool fron Great Neck Tools, but that will be another posting.


All the gussets are installed. I let it dry 24 hours before I move it. The rib is 62 inchs long so moving it can easily break joints loose if the glue isn't dry. I only use Resorcinol. It's easy to mix and always works, and is the only FAA approved glue. Don't waste time trying to sell me on others. I also use cement coated nails. No staples here. Again don't waste time on me just do it your way. That cool hammer is from 7th grade shop class, back in the stone ages when people were expected to have to earn a living with their skills.


I couldn't resist another picture of Rowan working that hammer. Before we flip the rib I trim the glue and gussets with a router bit used for trimming Formica. It works great and it's easier if you do each side as the gluing is done. You always want enough glue that a small bead oozes out of the joint.


Steaming to finished rib takes about 1 1/2 - 2 hours of work with all the parts pre-cut. I printed these pictures for Rowan and she gave her kindergarten class a report on how we did it for Show & Tell. Now I just need to finish the rest of the ribs before she's old enough to fly it.