 All the cap strips and other sticks needed for the solid ribs are cut. Some like the cap strips need steam bending, others need some shaping. Lots of little tasks.
Monday, January 10, 2011
Cap Strips and Other Sticks
All the cap strips and other sticks needed for the solid ribs are cut. Some like the cap strips need steam bending, others need some shaping. Lots of little tasks.
Friday, January 7, 2011
Flux For Soldering Wires
On the 1925 & 1926 WACO NINEs the external brace wires are stranded 1x9 Galvanized cable. From 1927 on WACO used solid streamlined wires, very expensive and slow to order these days. There are four different ways to form an end for attaching cables.
The ends on today's cables typically use a fitting which slips over the end of the cable and is swaged on, very nice and very expensive. The swaged fittings are designed to allow the cable to be loaded to it's full strength without failing before the cable.
Another way is to form a loop on the end of the cable either around a teardrop shaped thimble or around a grooved bushing with a hole in it. The loose end of the cable is the secured to the cable with a Nicopress sleeve which is crimped on with a relatively inexpensive tool.
(Per AC43.13-1B, Nicopress Process is a patented process using copper sleeves may be used up to the full rated strength of the cable when the cable is looped around a thimble.) These Nicopress sleeves and their tools were originally developed to slice telegraph wires instead of the overlapping twisted splice originally used, a very good method for splicing electrical wires, very strong.
On non-flexible 1x19 cable, or flexible cable less than 3/32" in diameter, you can also use a thimble and and secure the end of the wire by wrapping the loose end to the cable with annealed steel wire and soldering it all together. This is how the bracing cables on the NINE were made using 5/32 diameter 1x19 galvanized cable. Unlike the nicopress this method will only hold a load up to 90% of the cable strength and can be replaced with a nicopress sleeve, quicker and cheap but ugly.
On flexible cables such a 7x7 or 7x19 you can use the 5 tuck splice, the way ropes and cables (wire rope) were done before all this high tech stuff. Well I'm sure it seemed high tech 80 years ago. The 5 tuck splice is wrapped with a cotton serving cord to protect and stabilize it. The 5 tuck splice is only rated at 75% of the cable strength. There is also a 7 tuck splice which I believe is rated a little higher. All the control cable ends on the NINE were formed by using the 5 tuck method so we'll get into all that later. John Gaertner at Blue Swallow Aircraft just filmed a video (for sale) on how to do this. John lives down the road from me and does really cool WWI aircraft.
Back to the cables on the NINE. Today we tend to use Stainless steel cables. Galvanized cables don't last as well but cost less for the same rated strength and weight. I'll be using Galvanized because we're restoring this plane not trying to make an improved version. Galvanizing chemically bonds a layer of Zinc to the surface of the steel strands before the cable is wound. As you cut through the zinc to the steel the mix of zinc and steel varies from 100% zinc to 100% steel. This zinc protects the steel from corrosion even if scratched. It's not as good as stainless but this plane will not be spending it's life outside. The other cool thing about this zinc layer is it's easier to solder to then bare steel. You still need to remove surface corrosion for the solder to bind and that's the job of the flux.
So why this long story?
The latest version of AC 43.13-1B drops wrap-solder and 5 tuck splices completely. All the versions before as well as CAM 18 and older books I've found all have very specific requirements for the Wrap-Soldered Splice. We'll only talk about materials here. We'll deal with making the splice in another post.
From CAM 19 August 1, 1949:
The method of making the wrapped and soldered splice is as follows:
(1) The serving or wrapping wire shall be of commercial soft-annealed steel wire or commercial soft iron wire, thoroughly and smoothly tinned or galvanized.
(2) The solder shall be half-and-half tin and lead conforming to Federal Specification QQ-S-571. The melting point of this solder varies from 320 deg. to 390 deg. F., and the tensile strength is approximately 5,700 Pounds per square inch.
(3) Solder flux shall be a compound of stearic acid (there shall be no mineral acid present) and resin. A warming glue pot to keep the flux in fluid state is desirable.
And you thought we'd never get back to the flux. Also this is not a lead-free process so don't eat, drink, or breathe any of this stuff.
First off, NO Mineral Acid. What the heck is that?
To start with mineral acids are CORROSIVE. They'll get trapped in the strands of the cable and slowly dissolve it, not good. The common list includes Hydorchloric, Nitric, Phosphoric, Sulfuric, Boric, Hydrofluoric, Hydrobromic acids. The thing is they are not organic and they release hydrogen ions when dissolved in water because they have hydrogen bonded to some mineral, remember that chart of elements from chemistry class. Almost every commercial flux contains something like hydrochloric acid, zinc chloride, or ammonium chloride.
So what are Stearic Acid and Resin?
Stearic Acid is derived from animal or vegetable fats and oils. It's a fatty acid, you know, like that omega-3 fatty acid stuff that is supposed to be good for you. Fatty acids contain only Hydrogen, Oxygen, and Carbon, No Minerals. Stearic comes from the Greek word for Tallow.
Resin (Rosin) is a hydrocarbon which is secreted from trees, Pine Sap anyone. In solid form Rosin is used on bows for stringed instruments. In powdered form athletes and dancers use it to improve their grip. Did you know Frankincense is a resin?
.
I bought powdered Rosin at an athletic supply store. I thought it would mix/melt better, I was wrong. If I were doing this again I would use Lump Rosin. Artists use both forms. Daniel Smith has lump Rosin for about $12/lb., If you get 1/4 lb. it will probably be a lifetime supply.
I found Stearic Acid in candle form made by GMP at 3111 Old Lincoln Highway, Trevose, PA 19053-4996. It's their P/N 04320 Candle Stearine Flux. It comes as 6 pieces of broken candles in a bag, probably pieces from making tallow candles for churches or some such.
I used 2 pieces (4 1/2 ounces) mixed with 3 ounces of Rosin, a 60/40 mix. I cut the candle into small chunks so I could see if it would fit in my pot, but you're just melting it. I got the hot plate at the Hardware store for $15 and the iron pot from a gun supply store for $21. You don't need much heat.
.
Until it got to about 275 deg. F. it was just a milky looking mix with the rosin at the bottom. At that temp the rosin melted and it looked more like coffee, no cream.
.
.
 It turned back solid at about 150 deg. F. You need it liquid to brush it on/into the cable.
Next step is to start making some practice cable ends.
The ends on today's cables typically use a fitting which slips over the end of the cable and is swaged on, very nice and very expensive. The swaged fittings are designed to allow the cable to be loaded to it's full strength without failing before the cable.
Another way is to form a loop on the end of the cable either around a teardrop shaped thimble or around a grooved bushing with a hole in it. The loose end of the cable is the secured to the cable with a Nicopress sleeve which is crimped on with a relatively inexpensive tool.
(Per AC43.13-1B, Nicopress Process is a patented process using copper sleeves may be used up to the full rated strength of the cable when the cable is looped around a thimble.) These Nicopress sleeves and their tools were originally developed to slice telegraph wires instead of the overlapping twisted splice originally used, a very good method for splicing electrical wires, very strong.
On non-flexible 1x19 cable, or flexible cable less than 3/32" in diameter, you can also use a thimble and and secure the end of the wire by wrapping the loose end to the cable with annealed steel wire and soldering it all together. This is how the bracing cables on the NINE were made using 5/32 diameter 1x19 galvanized cable. Unlike the nicopress this method will only hold a load up to 90% of the cable strength and can be replaced with a nicopress sleeve, quicker and cheap but ugly.
On flexible cables such a 7x7 or 7x19 you can use the 5 tuck splice, the way ropes and cables (wire rope) were done before all this high tech stuff. Well I'm sure it seemed high tech 80 years ago. The 5 tuck splice is wrapped with a cotton serving cord to protect and stabilize it. The 5 tuck splice is only rated at 75% of the cable strength. There is also a 7 tuck splice which I believe is rated a little higher. All the control cable ends on the NINE were formed by using the 5 tuck method so we'll get into all that later. John Gaertner at Blue Swallow Aircraft just filmed a video (for sale) on how to do this. John lives down the road from me and does really cool WWI aircraft.
Back to the cables on the NINE. Today we tend to use Stainless steel cables. Galvanized cables don't last as well but cost less for the same rated strength and weight. I'll be using Galvanized because we're restoring this plane not trying to make an improved version. Galvanizing chemically bonds a layer of Zinc to the surface of the steel strands before the cable is wound. As you cut through the zinc to the steel the mix of zinc and steel varies from 100% zinc to 100% steel. This zinc protects the steel from corrosion even if scratched. It's not as good as stainless but this plane will not be spending it's life outside. The other cool thing about this zinc layer is it's easier to solder to then bare steel. You still need to remove surface corrosion for the solder to bind and that's the job of the flux.
So why this long story?
The latest version of AC 43.13-1B drops wrap-solder and 5 tuck splices completely. All the versions before as well as CAM 18 and older books I've found all have very specific requirements for the Wrap-Soldered Splice. We'll only talk about materials here. We'll deal with making the splice in another post.
From CAM 19 August 1, 1949:
The method of making the wrapped and soldered splice is as follows:
(1) The serving or wrapping wire shall be of commercial soft-annealed steel wire or commercial soft iron wire, thoroughly and smoothly tinned or galvanized.
(2) The solder shall be half-and-half tin and lead conforming to Federal Specification QQ-S-571. The melting point of this solder varies from 320 deg. to 390 deg. F., and the tensile strength is approximately 5,700 Pounds per square inch.
(3) Solder flux shall be a compound of stearic acid (there shall be no mineral acid present) and resin. A warming glue pot to keep the flux in fluid state is desirable.
And you thought we'd never get back to the flux. Also this is not a lead-free process so don't eat, drink, or breathe any of this stuff.
First off, NO Mineral Acid. What the heck is that?
To start with mineral acids are CORROSIVE. They'll get trapped in the strands of the cable and slowly dissolve it, not good. The common list includes Hydorchloric, Nitric, Phosphoric, Sulfuric, Boric, Hydrofluoric, Hydrobromic acids. The thing is they are not organic and they release hydrogen ions when dissolved in water because they have hydrogen bonded to some mineral, remember that chart of elements from chemistry class. Almost every commercial flux contains something like hydrochloric acid, zinc chloride, or ammonium chloride.
So what are Stearic Acid and Resin?
Stearic Acid is derived from animal or vegetable fats and oils. It's a fatty acid, you know, like that omega-3 fatty acid stuff that is supposed to be good for you. Fatty acids contain only Hydrogen, Oxygen, and Carbon, No Minerals. Stearic comes from the Greek word for Tallow.
Resin (Rosin) is a hydrocarbon which is secreted from trees, Pine Sap anyone. In solid form Rosin is used on bows for stringed instruments. In powdered form athletes and dancers use it to improve their grip. Did you know Frankincense is a resin?
.
I bought powdered Rosin at an athletic supply store. I thought it would mix/melt better, I was wrong. If I were doing this again I would use Lump Rosin. Artists use both forms. Daniel Smith has lump Rosin for about $12/lb., If you get 1/4 lb. it will probably be a lifetime supply.
I found Stearic Acid in candle form made by GMP at 3111 Old Lincoln Highway, Trevose, PA 19053-4996. It's their P/N 04320 Candle Stearine Flux. It comes as 6 pieces of broken candles in a bag, probably pieces from making tallow candles for churches or some such.

I used 2 pieces (4 1/2 ounces) mixed with 3 ounces of Rosin, a 60/40 mix. I cut the candle into small chunks so I could see if it would fit in my pot, but you're just melting it. I got the hot plate at the Hardware store for $15 and the iron pot from a gun supply store for $21. You don't need much heat.

.
Until it got to about 275 deg. F. it was just a milky looking mix with the rosin at the bottom. At that temp the rosin melted and it looked more like coffee, no cream.
.
.
It turned back solid at about 150 deg. F. You need it liquid to brush it on/into the cable.Next step is to start making some practice cable ends.
Tuesday, January 4, 2011
Solid Ribs
 There are several ribs made of solid 1/4" thick spruce. On each
wing the butt end rib is made solid the full length of the chord and is attached on the inboard end of the spars. The other solid ribs are all split into sections in front, between or behind the spars. They also vary as to whether they have 1/4" cap strips, no cap strip, or 1/8" plywood (wing walk). As a result there are several variations. I could have just drawn them all by hand on the wood, way to much work and possible errors. As I like to do with most such things I made some templates from galvanized sheet. I didn't want to make templates for all the variations. If I had more of each rib to make I would have made router templates. Instead they are used to draw the parts on the spruce with pencil. The ribs are then band sawed and belt sanded to a close tolerance. In the end 4 template pieces were made since I didn't have steel wide enough to make the long ribs in one piece. The red line running horizontally is 2" above the cord line and used to assemble the pieces.
 By using some very strong magnets, I use for installing vinyl wraps on cars, my nice straight edge was clamped to the pieces along the line while soldering them together with overlaps the size of the spars. The solder joint doesn't look all that good because I thought I could sweat the pieces together without leaving a mess so I only fluxed between the joint. OK, their solid and straight, just ugly.
 The extra piece for the nose rib allows for the sections which do not have cap strips or plywood. The other sections allow for a cap strip on the bottom and plywood on top. It was easier to mark 1/8" sorter and redraw the top lower on the pieces with cap strips on top.

 Drawing the ribs meant making a list of what needed to be included for each piece being drawn since all the notches and hole are available on the template. It really went very quick and was well worth the time to make the templates.
 All drawn out like a big model airplane kit. It only took a few hours to saw them all out and belt sand the edges smooth and square. The notches for the step supports are rough sawn and will be finished to a snug fit during assembly of the wings.
.
.
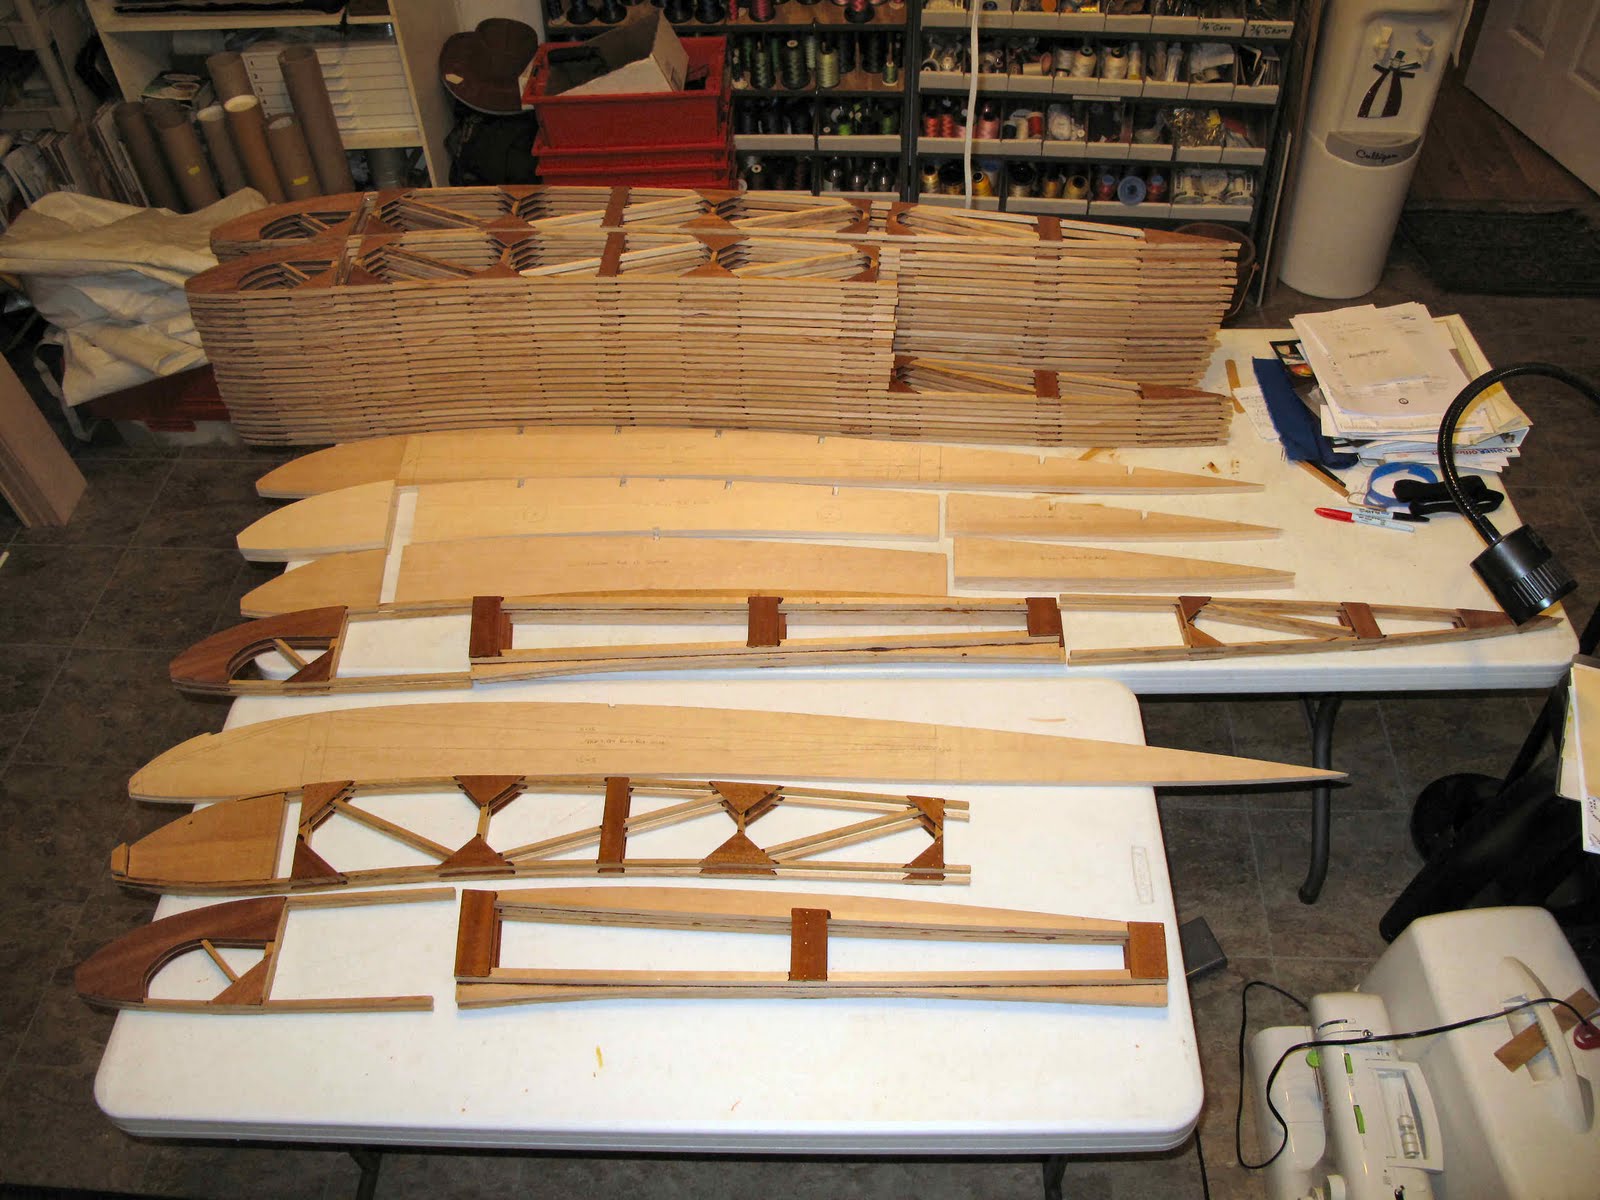 All the ribs needed to build the wings except the small ribs in the tip bow. We'll do those a soon as I get done cutting the cap strips and other sticks needed to assemble the wing. We're done with the slow repetitious work of building ribs. The next parts have their own challenges but it is so cool to finally be close to assembling the wings.
Monday, January 3, 2011
Trimming Light Ribs
 All the light ribs are done. The lead edge was trimmed using the fixture we showed earlier. A slight modification allowed it to be used to trim the short ribs to end flush with the back of the rear spar. It's always nice when life works out so well.
Saturday, January 1, 2011
Last Light Rib
 Happy New Year 2011
The last of the light (stick built) ribs is in the jig drying. When it's dry tomorrow I'll be able to trim up the nose and trailing edge on all of them, and sand all the gussets to soften the edges. I still have to build the 4 ribs at the wing tips and the solid root ribs. I'm nearly ready to cut out the template for the solid ribs. It's actually setting in the back of this picture.
The next big steps will be sawing, drilling, and routing the spar blanks which have been setting in the shop for 2 years. I've also got a tent set up in the driveway, for the Cessna 140 project, which I can use as a safe place to weld up the wing fitting assemblies, probably not safe to do in the attic.
All in all this should be a year when visible progress is made.
Wednesday, December 1, 2010
Wing Rib Triangle Gussets
I finished making the last Full (length) Light (stick built)Rib and started on the Short Light Ribs (14) for in front of the ailerons on the upper wings. In the process I discovered I'm short about 250 gussets, mostly the larger ones. I counted correctly on all the other parts. Somewhere in moving I lost or converted my fixture for making the triangle gussets. Since I had to make a new one it seemed a good idea to show how it works.
.
 It's made from a scrap of plywood with a stick glued on the bottom to guide it straight in the slot on the band saw table. Two pieces of 1/8" plywood are glued on top as guides for the 1/16" plywood gusset material. One block is perpendicular to the saw cut and the other is at a 45 deg. angle to the cut.
.
.
 The first task is to cut some strips of plywood gusset material. The large gussets need strips 1 3/4" wide and the small ones 1 1/4" wide.

On my other band saw I used a 1/16" 20 tooth blade. It's set up now for steel and to much trouble to change for wood. The finest blade they had at Lowe's to fit the Shop Smith was a 1/8" 15 tooth blade. Find the finer blade. This one leaves a cut which has to be cleaned up.
 The first cut with the jig is just to get the first 45 deg cut. Then just flip the strip over, slide it down to the stop and make the next cut and repeat...........


 It's pretty simple and it works. I saw some poor guy draw and cut such gussets with a paper pattern and a lot of hand work. This is very quick. The size of the gusset is all determined by the width of the strips.
.
 It's made from a scrap of plywood with a stick glued on the bottom to guide it straight in the slot on the band saw table. Two pieces of 1/8" plywood are glued on top as guides for the 1/16" plywood gusset material. One block is perpendicular to the saw cut and the other is at a 45 deg. angle to the cut.
.
.
 The first task is to cut some strips of plywood gusset material. The large gussets need strips 1 3/4" wide and the small ones 1 1/4" wide.
On my other band saw I used a 1/16" 20 tooth blade. It's set up now for steel and to much trouble to change for wood. The finest blade they had at Lowe's to fit the Shop Smith was a 1/8" 15 tooth blade. Find the finer blade. This one leaves a cut which has to be cleaned up.
 The first cut with the jig is just to get the first 45 deg cut. Then just flip the strip over, slide it down to the stop and make the next cut and repeat...........


 It's pretty simple and it works. I saw some poor guy draw and cut such gussets with a paper pattern and a lot of hand work. This is very quick. The size of the gusset is all determined by the width of the strips.
Tuesday, October 5, 2010
More Parts and Info for the Project
 The summer is over so I now have more time to work on the planes. I'm continuing to make the last of the stick built ribs while learning about the solid ribs which still need to be made. More on that next time. While travelling to a few fly-ins this summer I acquired some very cool things. At the Waco Historical fly-in I was talking with Tim Pinkerton who has a KNF and 2 WACO TEN projects. He mentioned he had a nose cowl he was sure was for a NINE and was willing to trade it.
 It's been modified with various holes and a lot of dents but if repairable and otherwise matches the drawings exactly. It will be one of my winter projects to repair it. It's made from a spun aluminum part with a former in it to give it it's oval shape and stiffness. It is so cool to have another original part. Because the front of the fuselage was cut off I had nothing of the engine cowl.
This would have been the most complicated part to make for the cowl. I'd like to repair it and paint it in the original Dutch Blue. Anyone have a 1926 ValSpar paint chart with dutch blue in it. I do have some original paint on the cockpit cowl parts under the black repaint of long long ago.
 The next cool thing was also at the Troy fly-in. Jim Beisner was kind enough to loan me his WACO TEN gas tank. It's the same as the NINE, 83 pounds of terneplate and solder. It has a dent on one side and a small hole from a branch on the other side. Both are easily fixed. Because there are no NINEs flying I wanted an original tank to keep the weight and balance the same until we know the rigging is right and the plane flys well. After that we'll make an aluminum tank and use the weight saving for something more important like a starter.
 .
. .
..
.
.
.
.
.
.
.
The last cool thing, for which I have no pictures is the result of going to the American Waco Club fly-in at Creve Couer. Steve Curry of Radial Engines Ldt. was there. Along with his engine work he's been gathering every bit of data on WACO TENS, he has a project plane. He's been scanning all the drawings he can get his hands on and put them all on a DVD. I loaned him my copy of the drawing list for the first 4,000 drawing numbers to add to the DVD.
I bought a copy and it has already been a gold mine worth twice the price. The large drawings will need a copy from the NASM archives because of scanning limits. The smaller ones are great.
Because the TEN is an improved NINE many of the details of how parts were made and many of the parts are in the TEN drawings. They made very few NINE drawing. The planes were nearly all built before the feds required drawings. Much of the little details just are not on any of the NINE drawings. For the TEN they eventually made drawings of almost all the parts. It's just been great.
My next WACO project will be an NAZ primary glider. I have a copy of the master drawing list which includes the NAZ and they all seem to be on this DVD.
Thanks Steve, Jim and Tim!
Subscribe to:
Posts (Atom)

