After making the
floor clips for John LeBlanc's WACO TEN making those for my NINE should be straight forward.
One thing I meant to point out earlier was that I find it easier to cut straight lines with the band saw if I draw 2 lines 1/16" apart. It's more like driving a car between the lines. It's harder to judge how far you are wandering from a line than it is how close you are getting to the other line. It means I waste less metal and have less clean up to do with the belt sander.
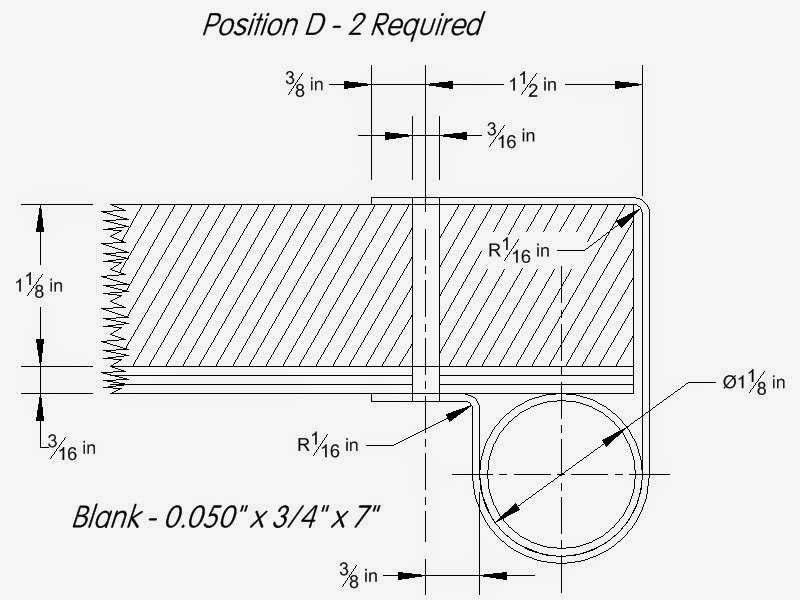
There are 4 different clips needed for the NINE vs only 2 for the TEN. In the TEN the 3/16" plywood floor sets on the 1/2" thick beams which set on the longerons. In the NINE the floor sets on the fuselage cross tubes and the beams are either above or below the Floor. In the cockpits the cross tubes are the same diameter as the longerons (1 1/8").
For this clip the beam is on top of the floor at the front of the passenger seat. It's made the same as the short clips for the TEN except the stack of wood is taller so it required a different form block for the last bend.
This clip is for the beam at the front of the pilot seat which also sets on top of the floor but with a notch cut out for the clip so the beam sets directly on the longerons. Again, it is the same except for the block to make the last bend.
The beam for this clip is under the floor in front of the pilot seat to provide support entering and exiting the cockpit. If it didn't include the floor it would just be a 1 1/8" wide "U". I think the factory made it as a "U", like the straps on the tail surface hinges, because the plywood was crushed toward the edge.
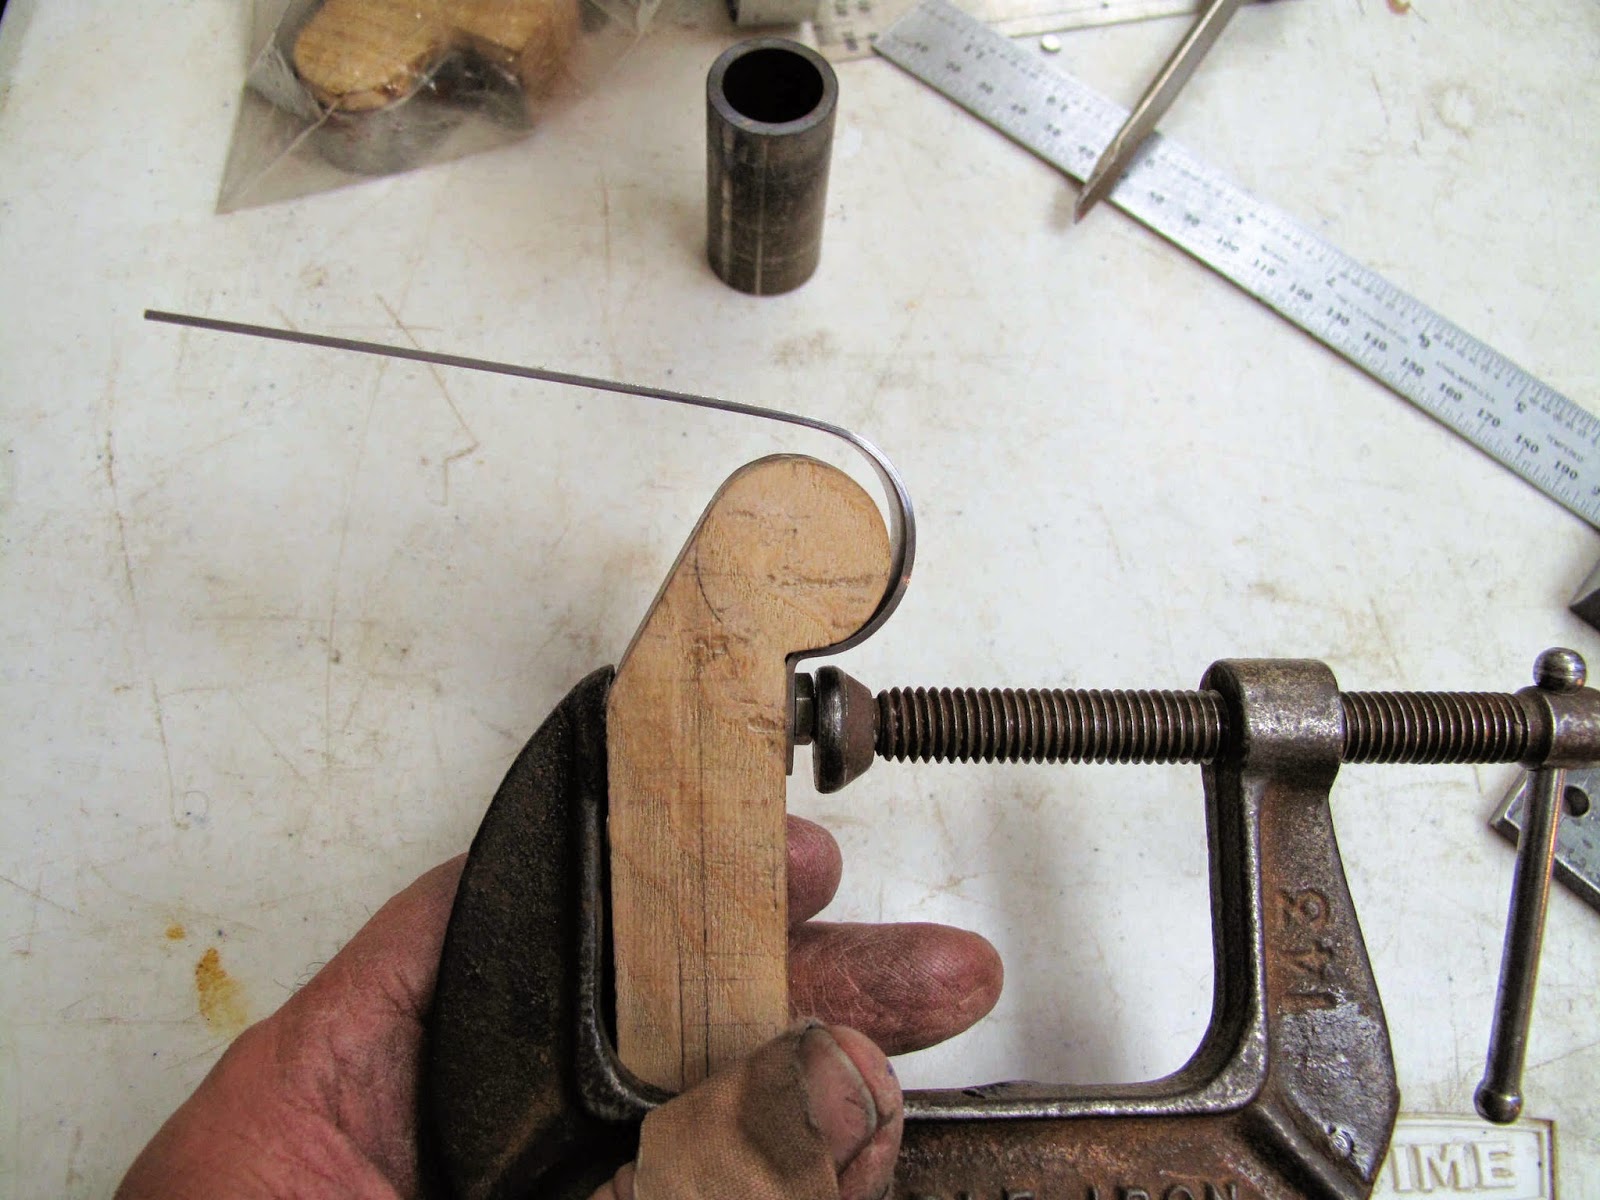
To create the 169.82 degree bend, the bend needs to go 1.6672" (191 degrees) around the 1/2" radius on the end of the form block. You can see the 11 degree taper on the bottom of the block.
The strip of steel is positioned on the block with a bolt to keep it from sliding. It's then clamped in the vise with a back up block, to keep it tight to the form block. The end is squared to the end of the block so it will wrap straight around the block.
The wedge, cut off when making the block, is positioned behind it to help hold the block tight. The end is then bent around the block.
Because the back of the vise gets in the way the bend makes it just past 90 degrees. To move the bend farther around the block I used a clamp, with a back up block. This got it about 30 degrees father but not all the way around the block.
From this point I added a clamp to hold the radius tight to the end of the block. The cross clamp was removed so this could be put in the vise to finish the bend.
The end clamp holds the strip in position until it is all snug in the vise.
With everything snug in the vise the end clamp is removed.
The wedge make the bend to be squeeze tight.
The spring back gets the angle needed to the top edge of the plywood.
The next block creates the bend which makes the 2 ends parallel. The position along the block is maintained with a bolt like on the first block.
The wedge at the bottom. in the vise, holds the strip tight to the block so the bend can be formed to the correct angle.
The wedge at the top pulls the bend using a clamp to tighten it to the block.
To locate the hole in the top end of the clip I first marked a point on the inside of the clip, using the square to hold the correct gap at the tip of the lower end.
A line was drawn at this point on the inside.
This line was then transferred to the outside of the clip.
The bolt hole was then located using the template for the first hole. The end was trimmed and finished as done on the TEN clips.
The last clip looks simple. The first bend is the same as short TEN clips.
The bend around the tube takes several steps like the previous part.
Again, starting in the vise the bend is made to about 90 degrees.
By holding it with a clamp the bend can be completed to about 30 degrees past 90 degrees.
Using a 1" diameter piece of tubing the clip is clamped in the vise so that the tab is tipped up about 20 - 30 degrees.
The long end is then bent down until it touches the end of the tab,
This didn't bend it quite far enough, so I used the mallet to tighten the bend a little further while holding the end so it touched end of the tab.
This worked to get the two ends parallel.
A few of the clips twisted slightly but were easily adjusted to alingn the 2 ends.
Because the bend for the tab on this clip is actually slightly more than 90 degrees, I adjusted it after finishing the bends. I just used a piece of 1/2" bar stock and a light tap with the mallet.
The finished part looks good. It will need to be opened slightly to install it over the tube, but the only way to get all the bends and lengths correct was to make them to the correct finished shape.
To locate the top (bottom in the picture) hole I used a 3/16" center drill to make a pilot hole. The hole was then finished with a #11 drill.
The clips are all made ready to paint. I need to finish my paint baking oven.


No comments:
Post a Comment