When I recovered the wings on my
Cessna 140 project I made wing stands so I could rotate the wings to have room to work on them in my attic. When I recovered the wings on our
Fly Baby I modified the stands to work with those wings. I'm using the ideas from the Fly Baby stand mod. to make the stands work with the WACO wings.
The idea for the stands came from the Cessna 140 club. I liked the basic idea of their stands but felt a few improvements were needed. Their stands were made from 2x4 lumber which is cheap and easy to work with. However the diagonal braces caused the legs of the stands to face away from the wings. This meant the weight of the wings wanted to tip the stands in toward the wings. You needed sand bags on the feet of the stands to prevent tipping. This made them difficult to move between my attic workshop and paint tent down in the driveway.
They also had only 2 positions for the wing, vertical and flat. I wanted more positions.
To solve the tipping problem I had to get rid of the diagonal braces so I could turn the feet toward the wing. I replaced the 2x4 bracing with 2 pieces of 3/4" EMT conduit bent to support the vertical member. They were complicated to bend but work great. The joys of a good conduit bender when you need one.
The weight of the wing is between the 2x4 cross pieces, making the stands very stable.
The other big change was an indexing plate on the root stand to allow positioning the wing in 15 degree increments. Much better.
There are two 3/8" bolts which are used as locking pins on the indexing plate.
The universal joint for the root end is right off the 140 Club drawing.
The Cessna wings have chordwise bolts to attach the wings to the fuselage. The Fly Baby and WACO NINE have vertical bolts running down through the center of the spars, but the universal joint is great for loading a wing with one person. The problem was how to make it work with the Fly Baby biplane wings.
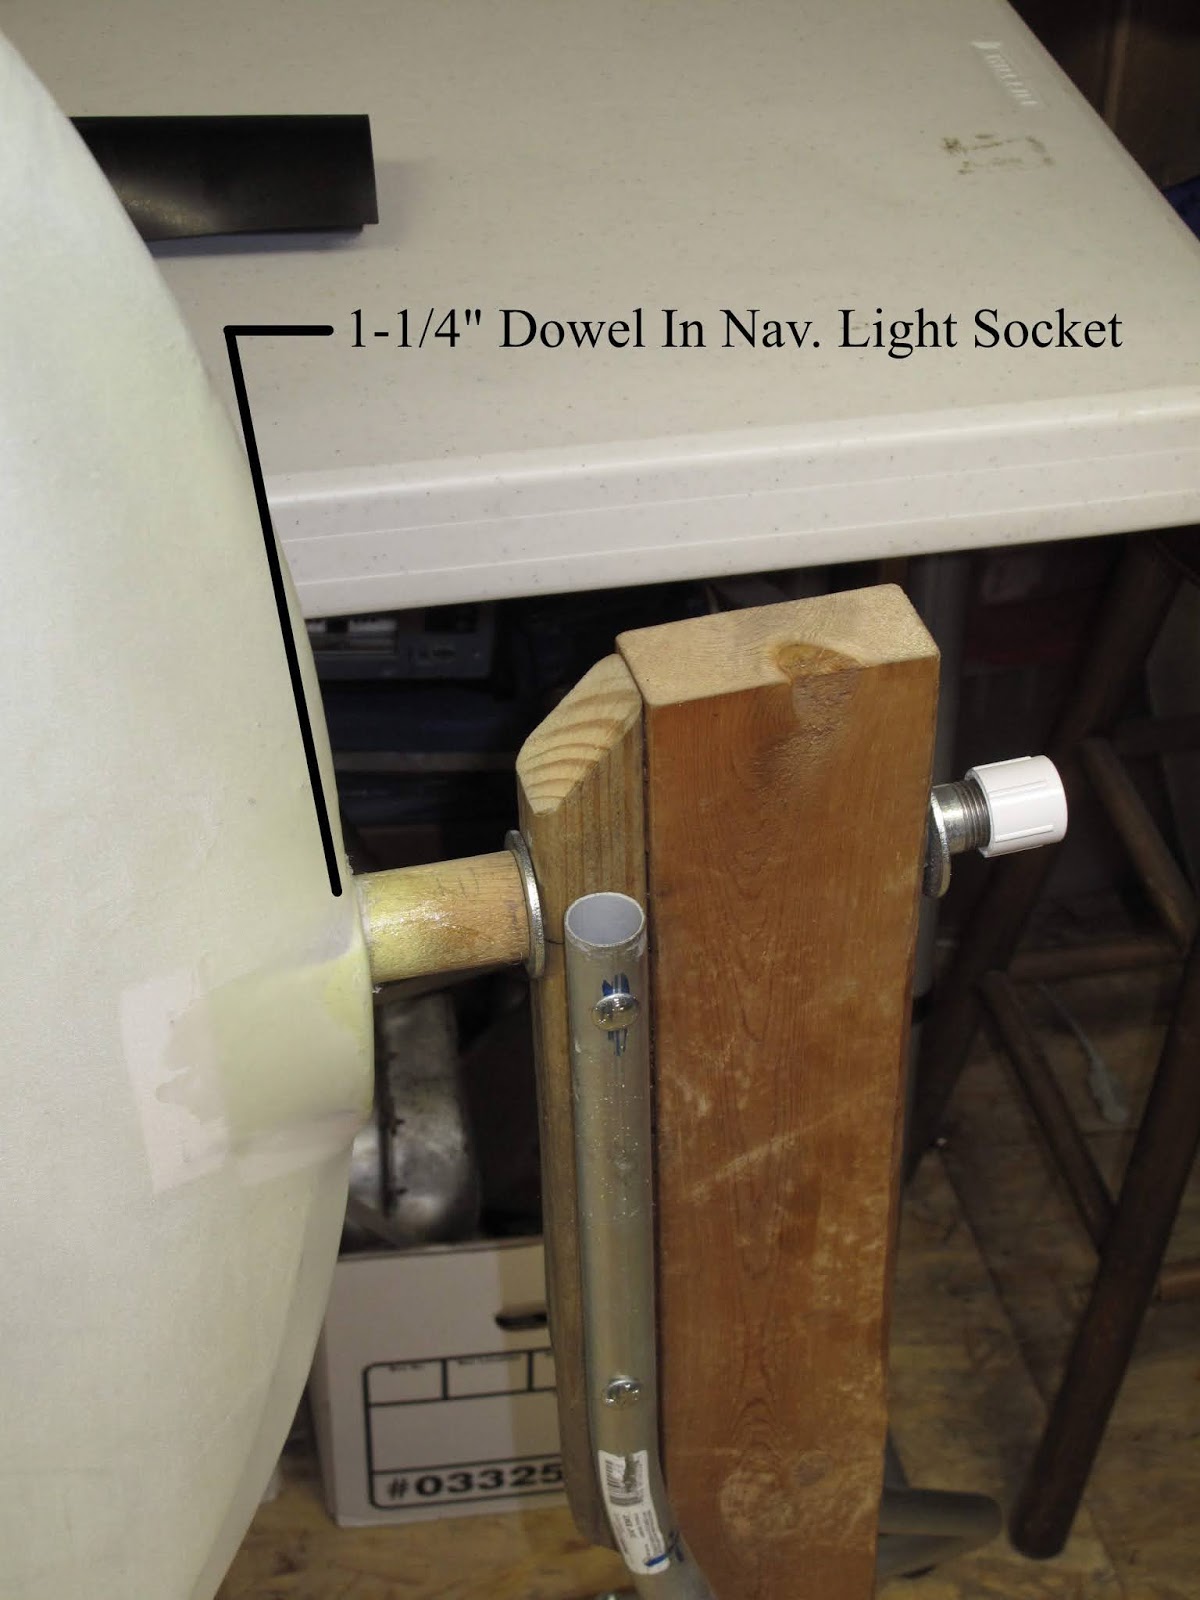
The Cessna also has a wing tip, navigation, light with a socket which makes a perfect pivot point for the tip end of the wing. Neither the Fly Baby nor the WACO have such a convenient hole in the tip so some other attachment was needed at the tip.
One of the benefits of of the conduit legs is that I was able to make the stands somewhat stackable for storage.
The rotation pivot at the root is a long pipe nipple threaded into a screw on table leg plate. It really works well. I use a plastic threaded cap on the free end. It stays on well but is easily removable when installing or removing a wing from the stands.
To mount a wing on the stands you start by laying the wing on the floor between the stands. Then pick up the root end and stick the pivot through the hole in the root stand's vertical leg, and install the retainer cap. The universal joint design makes this easy.
Once the root end is secured, the tip end is attached to it's stand. On the 140 wing you just stick the pivot plug in the light hole and you're done.
The Fly Baby wings also had some added complexity to the problem because the Biplane wings are swept back 9 degrees.
Basically I made spar extensions which positioned the bolt holes like on the C-140 wings. The "C" shaped end goes over the end of the spar. The long bolt then goes through the bolt hole in the spar converting it to a chordwise bolt arrangement.
A spreader bar between them makes it all rigid.
After that it attaches to the stand u-joint piece with the dowel just like the Cessna wing did.
At the tip end I made a clamp from some pieces of plywood.
It clamps onto the wing tip bow.
The pivot tube is a piece of 1/2" Schedule 40 PVC Pipe with one end heated and flattened. This pivot tube goes through the stand hole and is secured with the friction fit of a PVC Tee.
I eventually installed shorter bolts.
Now the WACO. I used the same idea as the Fly Baby to convert the ends of the spars to a chordwise bolt arrangement.
The problem on the NINE is that while the bolts go through the center of the spars like on the Fly Baby, the spars are not parallel. The top of the front spar tips forward 6 1/2 degrees and the rear spar tips back 3 1/2 degrees. Therefore the holes in the extensions can't be pre-drilled.
I figured out I could drill one hole for the rear spar then work from it to drill the others to fit.
I started with only sticks on one side of the extenders until I had those holes drilled to fit.
I pinned the first hole on the LH wing then used the tip of the long 5/16" drill to mark the next hole and drilled it.
This process got repeated on the RH wing.
Then I glued and screwed on the sticks on the other side of the extenders.
I went to put the whole thing on the LH wing, so I could drill the second stick holes, and found I hadn't made the gap wide enough on the forward spar extender.
There was no way to get it to fit over the spar and also line up with the rear spar.
A little work with the disc sander fixed the gap problem.
Then a repeat of align one hole and drill the next got all the bolt holes for both left and right wings.
Yea! it fits.
Like on the Fly Baby I made some long bolts from threaded rod. In this case 5/16" rod. Nuts jammed together form the bolt heads and wing nuts keep them from coming loose while rotating the wings.
The WACO and the Fly Baby adapters for comparison.
I had to shorten the universal joint piece 1/4" for it to fit the WACO adapter, but it works.
Wing on the Floor.
Attach the adapter. Lift the root end and install the pivot in the stand. Lock the rotation with the pins.
I made a tip bow clamp like the Fly Bay one to fit the WACO tip bow.
I did find I needed bigger bolts to clamp it tight. The WACO wing weighs a lot more than the Fly Baby. On the Fly Baby the main bolt is a 3/8" carriage bolt and the clamp bolts are 1/4", all wit wingnuts for easy tightening. On the WACO they're all 3/8", much easier to tighten.
It really works nice. I'm looking forward to using these to varnish the wings.
They're very easy to operate with the 2 pins at the root end.